
How to Use Clash on a Remote Linux Server
Published:
This tutorial explains how to install and configure Clash on a remote Linux server. It’s especially useful when you need to bypass network restrictions to access external sites such as Hugging Face, Google, and others, all without requiring sudo privileges.
Contents
- Step 1. Download Clash for Linux
- Step 2. Create the Configuration Directory
- Step 3. Editing the
config.yamlFile - Step 4. Starting Clash
- Step 5. (Optional) Add Proxy Shortcuts to
.bashrc - Reference
Step 1. Download Clash for Linux
First, download the appropriate Clash binary for your system from the official GitHub releases page https://github.com/doreamon-design/clash/releases. For most 64-bit systems, choose clash_2.0.24_linux_amd64.tar.gz.
After uploading the package to your remote server (for example, to your home directory ~), extract it:
tar -xvf clash_2.0.24_linux_amd64.tar.gz
This command will produce three files: clash (the executable), README.md, and LICENSE. Only the clash binary is required. Then grant execution permission:
chmod +x clash
Step 2. Create the Configuration Directory
Clash stores its configuration files in ~/.config/clash/. If this directory doesn’t exist, create it manually:
mkdir ~/.config/clash
Then, add two required files to this folder: config.yaml (your subscription configuration file defining nodes, rules, and ports) and Country.mmdb (a GeoIP database from MaxMind used to identify the target IP’s country or region).
⚠️ Note: The config.yaml file comes from your paid subscription. You need to obtain it locally and then upload it to your remote server. The Country.mmdb file is usually downloaded automatically with the subscription.
After purchasing the subscription, you can locate the configuration file as follows (these operations are performed on your local machine, not on the remote server):
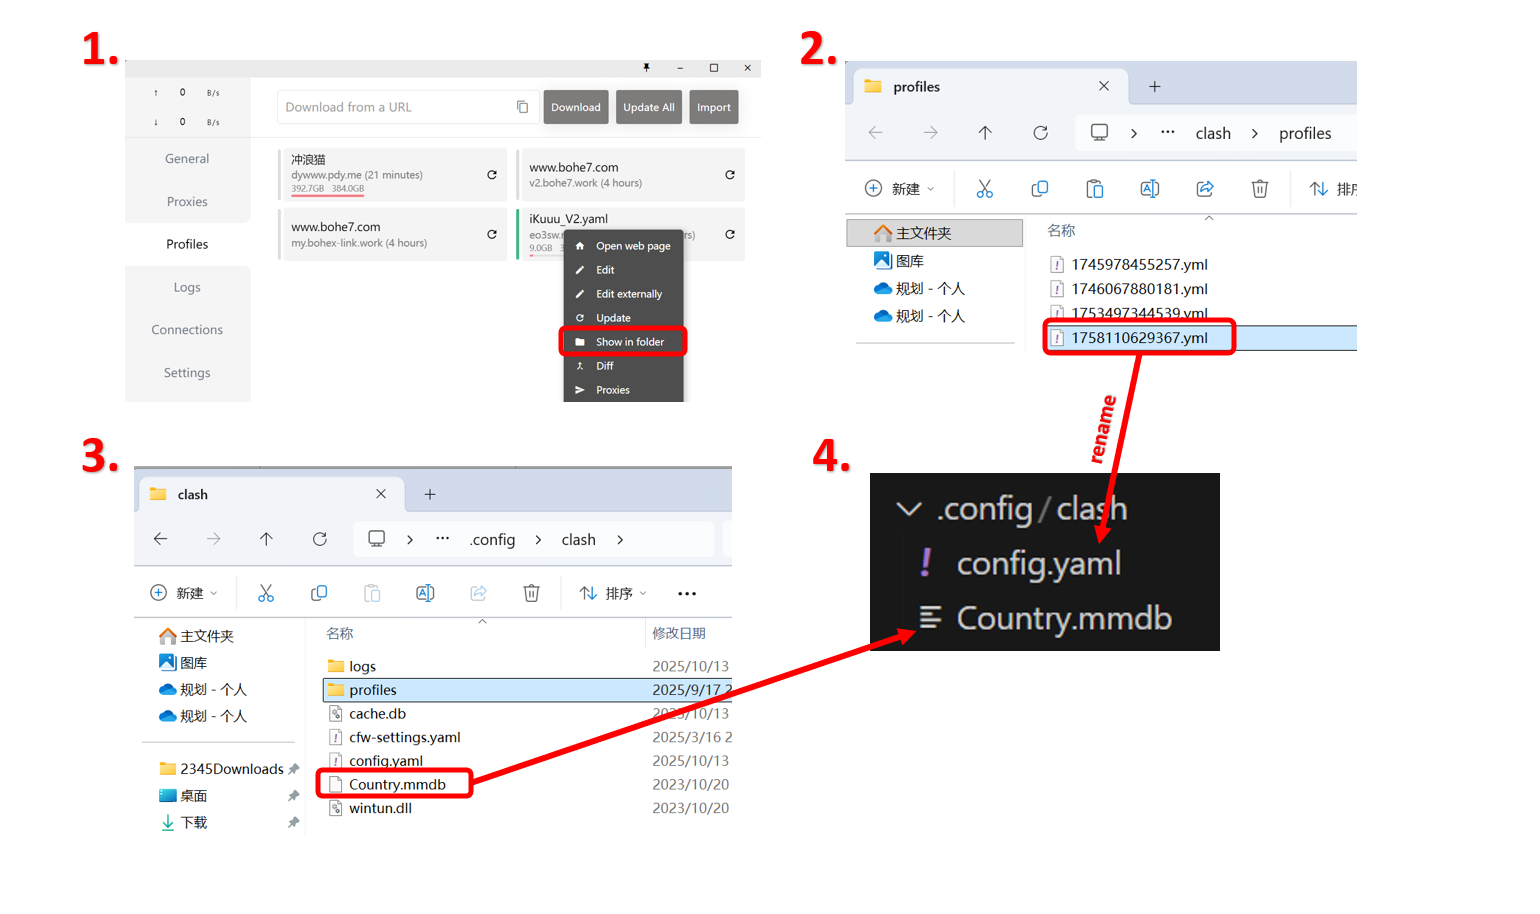
- Open the subscription you want to upload to the remote server. Right-click and select “Show in Folder”. This will automatically navigate to the corresponding
.ymlconfiguration file. - Before uploading to the remote server, rename it to
config.yaml. - For the
Country.mmdbfile, you can try looking in the parent directory. If it was not automatically downloaded with your subscription, you can choose one method listed below:
(1). Automatically download it:
cd ~/.config/clash/
wget -O Country.mmdb "https://cdn.jsdelivr.net/gh/Loyalsoldier/geoip@release/Country.mmdb"
(2). Manually download it from MaxMind GeoIP Releases and then upload it to ~/.config/clash/.
- Finish.
Step 3. Editing the config.yaml File
Here is the basic structure of the config.yaml file:
port: 7890
socks-port: 7891
allow-lan: false
mode: Rule
log-level: info
external-controller: 127.0.0.1:9090
unified-delay: true
…
Here, port specifies the HTTP proxy port (default 7890), socks-port specifies the SOCKS5 proxy port (default 7891), and external-controller defines the management API port for external programs like Clash Dashboard. The default ports may conflict with other running proxy programs, so you can change them if needed. For example, set the HTTP port to 7892 and the SOCKS5 port to 7893 (or any other numbers you want). After editing, the config.yaml might look like this:
port: 7892
socks-port: 7893
allow-lan: false
mode: Rule
log-level: info
external-controller: 127.0.0.1:9096
unified-delay: true
……
Step 4. Starting Clash
After completing the previous steps, you can start Clash to enable the proxy.
If the clash binary is in your home directory ~, first navigate to that directory and run:
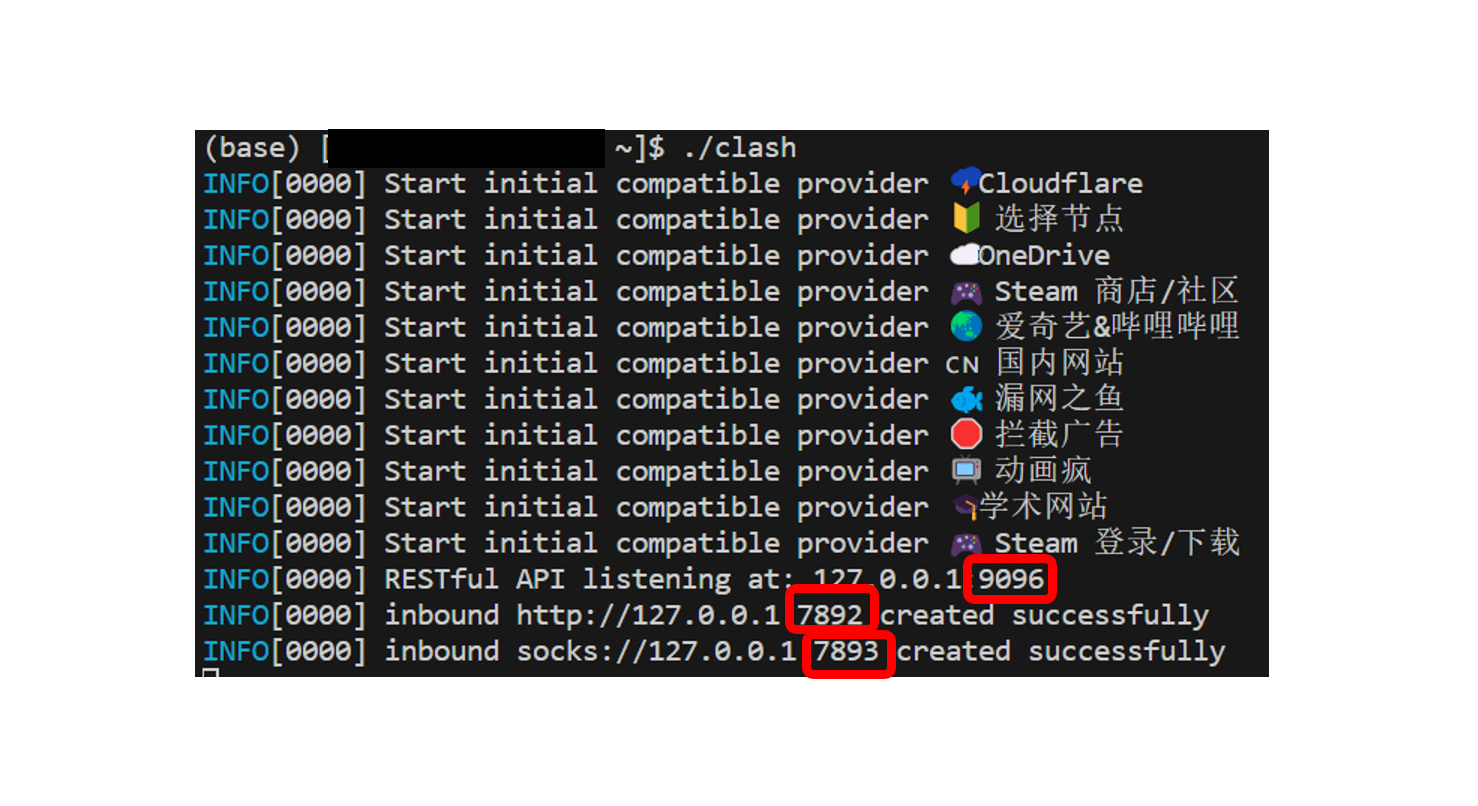
./clash
You should see output similar to the following, with the ports 7892 and 7893 corresponding to the ones you configured:
Once Clash is running, test whether the proxy works. Open a new terminal and set the system proxy:
export https_proxy=http://127.0.0.1:7892  # https
export http_proxy=http://127.0.0.1:7892   # http
export all_proxy=socks5://127.0.0.1:7893  # socks
Then test access:
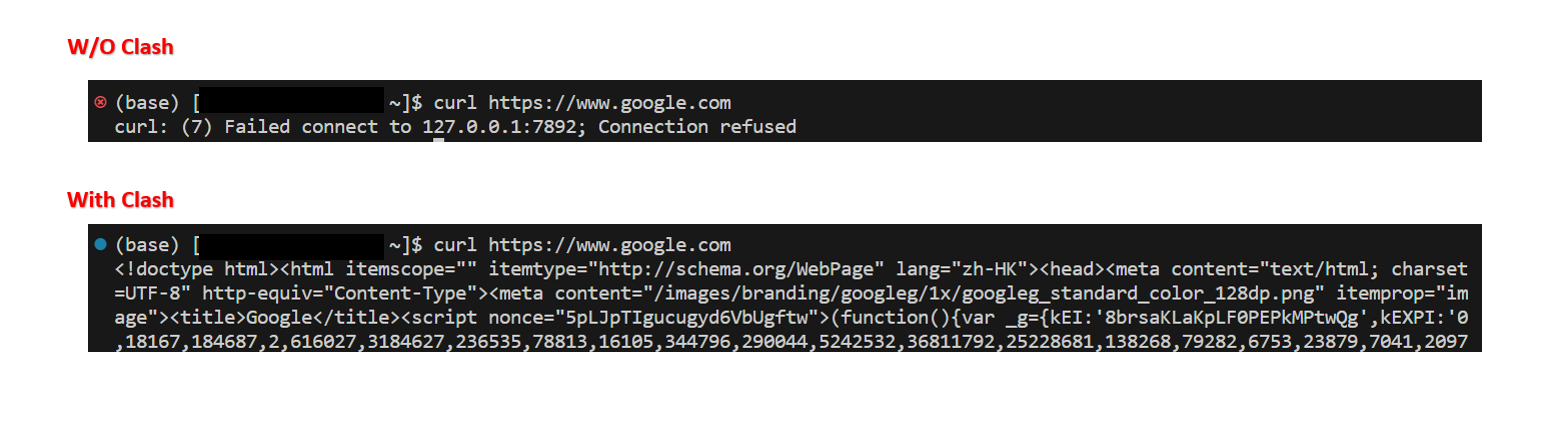
curl https://www.google.com
Without the Clash proxy, accessing https://www.google.com will fail with a “Connection refused” error. If the proxy is working correctly, the command should succeed as shown below:
Step 5. (Optional) Add Proxy Shortcuts to .bashrc
To avoid manually setting system proxy every time you open a new terminal, you can add the following functions to your ~/.bashrc file:
# Proxy Setting
function proxy_on() {
  export http_proxy="http://127.0.0.1:7892"  # http
  export https_proxy=$http_proxy  # https
  export all_proxy="socks5://127.0.0.1:7893"  # socks
  export no_proxy="localhost,127.0.0.1,localaddress,.localdomain.com"
  echo -e "Proxy On"
}

function proxy_off() {
  unset http_proxy
  unset https_proxy
  unset all_proxy
  unset no_proxy
  echo -e "Proxy Off"
}
Then reload the .bashrc file:
source ~/.bashrc
Now you can easily toggle the proxy:
proxy_on   # Enable proxy
proxy_off  # Disable proxy
Reference
[1] YuYoung32 — Linux Clash Setup
[2] Zhiyang Liang — Configure Clash on Remote Server
Updated on a cloudy day, October 13, 2025 — Shenzhen, China. 🌤️
